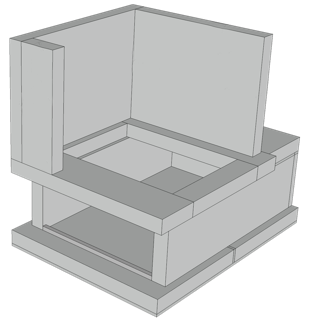
Step 4 First layer of the bell. Placing the core
Bell: the first layer
The top of the firebox should be exactly level with the first layer of the bell. In the SketchUp drawing, that first layer is 400 mm. The firebox is 348 mm, with underneath a 50 mm high tile and a 2 mm high layer of ceramic felt.
The side walls of the first layer are two full tiles of 400 x 600 mm. The back wall has 50 mm sawn off on both short sides (as shown in the photo of the diamond circular saw, see Step 2).
At the front, there are two tiles of 400 x 130 mm.
Now glue the left tile and the back tile in place (fig 1). The rough side of the tiles is on the outside. Use clamps again to press the parts together. Make sure it is flat, square, level and at the same height.
Then glue the right tile and the two front tiles in place.
Finally, glue a 548 x 240 x 50 mm tile to the bottom.
Installing the core
The glue of the core must be fully hardened: let it dry for at least 3 days before lifting it into place. The tiles of the first layer must also have had time to harden thoroughly.
Place a piece of ceramic felt measuring 540 x 220 x 2 mm on the bottom tile. Secure it with a few dabs of glue so it does not shift (fig 2).
Then place the transport board with the core as close as possible to the stove, preferably on an elevation of concrete blocks or something similar. Remove the battens from the transport board. In two places you pull a strap under the bottom of the core, and with two people you carefully lift the core onto the ceramic felt with these straps. See the photos above.
The front must be flush with the front of the bell. Check with a level, a square and a tape measure whether everything is in the right place.
Once everything is in order, you fill the gaps on either side of the core with two strips of Superwool. First press them flat so that they can easily be pushed into the opening (fig 3). Finally, on top of the firebox you place a 50 mm wide strip of Superwool.
Retaining plates
Place a piece of Superwool onto both walls of the firebox, and against it a steel plate of 300 x 345 x 4 mm. These plates rest on two nails, which you have inserted into the ceramic felt.
On top of two layers of Superwool you place a steel plate of 230 x 248 x
4 mm.
In two 15 x 15 mm tubes with a length of 490 mm, you drill a hole 25 mm from the ends, and insert two Ø 8 mm threaded rods through them. Use wing nuts to tighten the tubes against the side plates, and wedge the top plate into place (fig 4).
1.
3.


ceramic felt

bottom tile
2.


4.
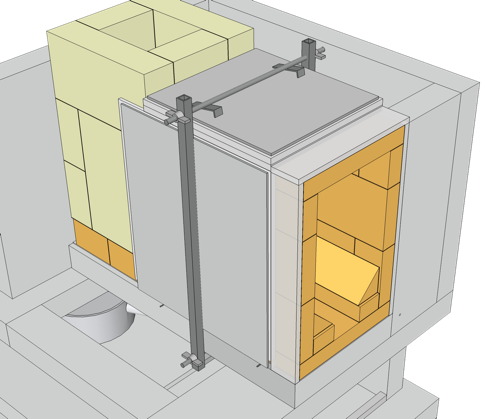
nail


tube 15x15
mm
rod
wedge